Use this option to inquire on or maintain the contents of a sub-assembly. This menu option is only enabled if the item being sold is a sub-assembly.
You can only maintain the contents of the sub-assembly if the kitted item has a Sub-Assembly Type of "Dynamic Component List" in the Inventory master file – see "File - Inventory - Kit".
Refer to "Entering Invoice Lines - Standard" or "Entering Invoice Lines - Supply Chain (v2.8)".
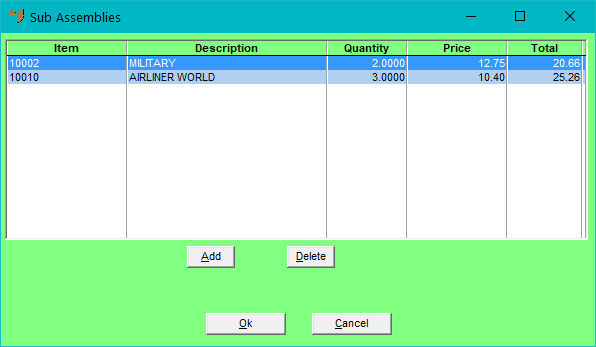
Micronet displays the Sub Assemblies screen. For sub-assemblies with a static component list, there are no Add or Delete buttons on this screen.
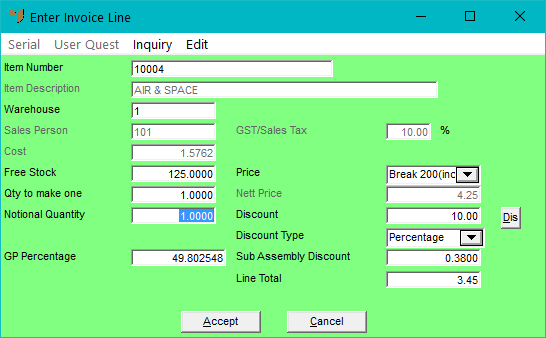
If you selected to add or edit an item, Micronet displays an abbreviated version of the Enter Invoice Line screen.
|
|
Field |
Value |
|---|---|---|
|
|
Item Number |
If you are adding a component item to the sub-assembly, enter the item ID. You can also press Tab or Enter to select an item. If you are maintaining a component item, Micronet displays the item ID. |
|
|
Item Description |
Micronet displays the description of the selected item. |
|
|
Warehouse |
Micronet displays the warehouse from which the item will be supplied from the Invoice Header screen. |
|
|
Sales Person |
Micronet displays the salesperson entered against this invoice from the Invoice Header screen. |
|
|
GST/Sales Tax |
Micronet displays the GST or sales tax applied to this item. |
|
|
Cost |
Micronet displays the buy price for the item from the Item master file – see "File - Inventory - Sell Price". |
|
|
Free Stock |
Micronet displays the quantity of the item available. |
|
|
Qty to make one |
If you are adding an item, enter the quantity of the component item required to make up one sub-assembled item. For example, if you are adding wheels to a bike sub-assembly, you would need 2. If you are maintaining an item, Micronet displays the quantity. |
|
|
Notional Quantity |
Notional quantities are used where the sales quantity is different to the ordered quantity for orders – for example, for meat supplies where orders are in quantities and sales are in kilograms, etc. This field is only enabled if the Use Notional Quantities field on the Inventory Configuration screen is set to Yes – see "Edit - Program - Inventory". |
|
|
Price |
Micronet displays the default selling price for the item according to the settings in the Debtor master file. This may be the debtor default price, a contract price, the price calculated according to a discount matrix or a special price. Note that the contract price always overrides the debtor default price, discount matrix and special price. For more information on how Micronet calculates prices, see "How MDS Calculates Prices During Order Entry". You can change the price if you have the appropriate user access. Select the price break for the item; Micronet displays the selected item price. If you select Nett in this field, you can enter a fixed price in the Nett Price field. You can only change invoice pricing if the Override Invoice Pricing field on your user ID is set to Yes – see "Maintenance - Edit UserIDs - 4. MDS Security". If you do, details are stored in the Price Override Audit file for management reporting purposes |
|
|
Nett Price |
Micronet calculates the net price based on the debtor/item pricing matrix. If you selected Nett in the Price field, you can enter a fixed price. |
|
|

|
Technical Tip You need to be aware of whether your net prices include or exclude GST – for more information, see "Edit - Program - Tax". |
|
|
Discount |
Micronet displays any discount that applies to the component item for this customer. This could be set as a discount matrix in the Debtor master file, as a debtors contract price or as a special price. You can enter a discount or change the discount displayed if required. Note that this discount on the component item is in addition to any discount applied to the main sub-assembled item. |
||||||||||||||||||||||||
|
Discount Type |
If you entered a discount in the previous field, select the discount type. Options are:
|
|||||||||||||||||||||||||
|
GP Percentage |
Micronet calculates the gross profit percentage using the values in the Cost, Price and Discount fields. If you want to set your GP percentage based on a different cost price from an alternate supplier, select the GP button – see "Enter Invoice Line - GP". |
|||||||||||||||||||||||||
|
Sub Assembly Discount |
Micronet displays the $ amount of the discount applied to the component item's discounted price. For example, say you have a men's bicycle that is made up of 1 frame, 2 wheels and 2 brakes. The bike normally retails for $200 but there is currently a 10% discount on these bikes. Additional discounts are also applied to the individual component items. The prices and discounts on each component item would be calculated as follows:
|
|||||||||||||||||||||||||
|
Line Total |
Micronet displays the total value of the final component price as shown in the previous example (i.e. the quantity x the price minus any discounts), plus any GST or sales tax applicable. |
If you added an item to the sub-assembly, Micronet redisplays the Enter Invoice Line screen so you can add further items to the sub-assembly.
Micronet redisplays the Sub Assemblies screen listing the items you added.
Micronet redisplays the Enter Invoice Line screen.